
Adding a Git Client Node in an Individual Developer Centralized Workflow
Feb. 9, 2023, 4:06 p.m.
Git (or another SCM) is essential in collaborative software development. It is also very helpful for individual developers not only for managing software configuration, maintaining a remote backup, maintaining a separate authoritative software configuration on a remote computer, but for allowing the individual developer to work on a project on multiple computers and have the current state of the repository available on all of the developer's computers.
This article describes the process for duplicating a repository on an additional computer when an instance of a repository already exists on one local computer and on one remote computer. The resulting collection of computers -- two of the developer's workstations and a central server, possibly using a service such as GitLab -- then constitutes the elements of centralized, distributed Git workflow with two client nodes and one central server.
Introduction
Git SCM is an indispensible tool for developers collaborating on a software project using the various workflows described in Section 5.1 Distributed Git - Distributed Workflows of the Pro Git book. It is also useful to individual developers for managing software configuration just as it is for a collaborating group. Besides managing software configuration, individual developers can use it to maintain a remote backup, maintain a separate authoritative software configuration on a remote computer, and to allow the individual developer to work on a project on multiple computers and have the current state of the project repository available on all of the developer's computers by employing the centralized distributed workflow.
The following image illustrates two use cases for individual developers. The left pane depicts the simple backup scenario in which the developer works on a project and tracks changes on a repository on their workstation, labeled "original client node", and periodically pushes to a remote server, labeled "central server", in which the project repository has been duplicated. The project could have been created in a directory on the client node, the git repository initialized there and, then duplicated on the remote server.
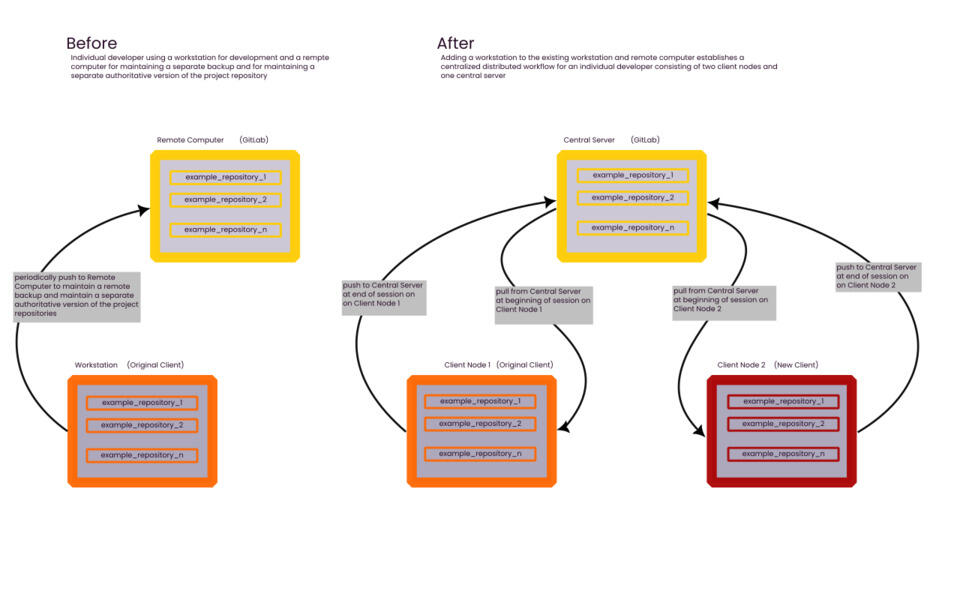
A GitLab Repository and Client Nodes as Part of a Centralized Workflow
The After side of the image shows a centralized distributed workflow for an individual developer established after adding a workstation to the existing workstation and remote computer shown in the Before side of the image. The result is a centralized distributed workflow consisting of two client nodes and one central server.
The right pane depicts a git centralized distributed workflow, the simplest of the possible distributed git workflows described in Section 5.1 Distributed Git - Distributed Workflows of the Pro Git book. In this scenario multiple developers could work in the versions of the same repository on their local workstations, labeled "client nodes" and then push to a version of the repository acting as the authoritative version of the project repository on a central server, also referred to as a hub in Pro Git. With this workflow paradigm, reconciling changes made to the project by different developers can be problematic if there are conflicting changes to the project.
However, for an individual developer, this workflow is ideal for allowing the developer to work on any workstation and always have the current state of the repository available when they move to a different workstation. This only requires pushing to the central server at the end of a session on one workstation and pulling from the central server when beginning a session on another workstation. For an individual developer, it is also possible to achieve this without the central server, i.e., to always have the current state of the repository available when beginning a session on any node by pushing directly to all other nodes when ending a session on a node, but it is easier -- especially if there are many client nodes -- to push to the central server when finishing a work session on one client node and pulling from the central server when beginning a session on another client node.
In this article we discuss the process for setting up an additional client node to realize the second workflow paradigm, after the first has already been established. The essential part of the process is simply cloning the repository from the central server after ensuring that the instances of the repository on the client node and the central server are in the same current state. After the second client node has been established, the same process could be used to add additional client nodes to the workflow configuration.
Prepare Central Repository
Before cloning the central repository on the new client node it is best to ensure that the central repository is in the same state as the repository on the original client node, i.e., all of the latest changes made on the client node are incorporated in the central repository, otherwise when the central hub is cloned on the new client node, it will not reflect the current state of the project.[1] On the original client node:
-
Stage latest changes to tracked files for commit.
100% 15:14:03 USER: brook HOST: ARCH-16ITH6 on exp [!] example_repository ❯$ git add -u
-
Commit latest changes.
100% 15:14:10 USER: brook HOST: ARCH-16ITH6 on exp [+] example_repository ❯$ git commit -m "Incremental commit. made changes to 'adding-a-client-node-in-a-git-centralized-workflow-source-configuration-manegement-system.html'." [exp d598b18] Incremental commit. made changes to 'adding-a-client-node-in-a-git-centralized-workflow-source-configuration-manegement-system.html'. 1 file changed, 48 insertions(+), 6 deletions(-)
-
The latest changes could also be added to other branches depending on the organization of the project. In this example there is an experimental branch called exp and a main branch called master. We incorporate changes to the master branch:
100% 15:16:52 USER: brook HOST: ARCH-16ITH6 on exp PCD: 2s example_repository ❯$ git fetch . exp:master From . 88bdde3..d598b18 exp -> master
-
After staging and committing changes on the current branch, the working tree(s) will be clean, meaning that all tracked files in the current branch have been staged and committed in the local client node. This can be verified with:
100% 14:04:36 USER: brook HOST: ARCH-16ITH6 on exp example_repository ❯$ git status On branch exp Your branch is up to date with 'origin/exp'. nothing to commit, working tree clean 100% 14:05:40 USER: brook HOST: ARCH-16ITH6 on exp
If changes have been incorporated into other branches, they can also be verified, by first switching to the branch and using the same command: 100% 14:04:45 USER: brook HOST: ARCH-16ITH6 on exp example_repository ❯$ git checkout master Switched to branch 'master' 100% 14:16:02 USER: brook HOST: ARCH-16ITH6 on master example_repository ❯$ git status On branch master nothing to commit, working tree clean 100% 14:16:06 USER: brook HOST: ARCH-16ITH6 on master example_repository ❯$
-
When the working tree is clean, ensure that all branches have been pushed to the remote origin, the repository on the central server. This will ensure that the latest changes on the original client node will be incorporated into the repository on the central server, and it will be identical to the instance of the repository where the latest changes were made.
100% 15:16:34 USER: brook HOST: ARCH-16ITH6 on exp [⇡] example_repository ❯$ git push origin exp Enumerating objects: 11, done. Counting objects: 100% (11/11), done. Delta compression using up to 16 threads Compressing objects: 100% (6/6), done. Writing objects: 100% (6/6), 2.37 KiB | 2.37 MiB/s, done. Total 6 (delta 5), reused 0 (delta 0), pack-reused 0 remote: remote: To create a merge request for exp, visit: remote: https://gitlab.com/gitlab-individual-username/example_repository/-/merge_requests/new?merge_request%5Bsource_branch%5D=exp remote: To gitlab.com:gitlab-individual-username/example_repository.git 88bdde3..d598b18 exp -> exp 100% 15:16:52 USER: brook HOST: ARCH-16ITH6 on exp PCD: 2s example_repository ❯$ git fetch . exp:master From . 88bdde3..d598b18 exp -> master 100% 15:16:58 USER: brook HOST: ARCH-16ITH6 on exp example_repository ❯$ git push origin master Total 0 (delta 0), reused 0 (delta 0), pack-reused 0 To gitlab.com:gitlab-individual-username/example_repository.git 88bdde3..d598b18 master -> master
Clone Repository on New Client Node
Once the previous steps have been performed, the state of the repository on the existing client node and the server will be identical. We can now clone the repository from the central server to the new client by executing a git clone command. The command can take many options and up to two arguments, but at a minimum, it requires one argument that identifies the remote server and the remote repository, using either an https or ssh protocol. If the central server is a GitLab server, the two possible arguments are displayed when clicking the "Clone" button on the project's main GitLab web page, as shown in the following image.
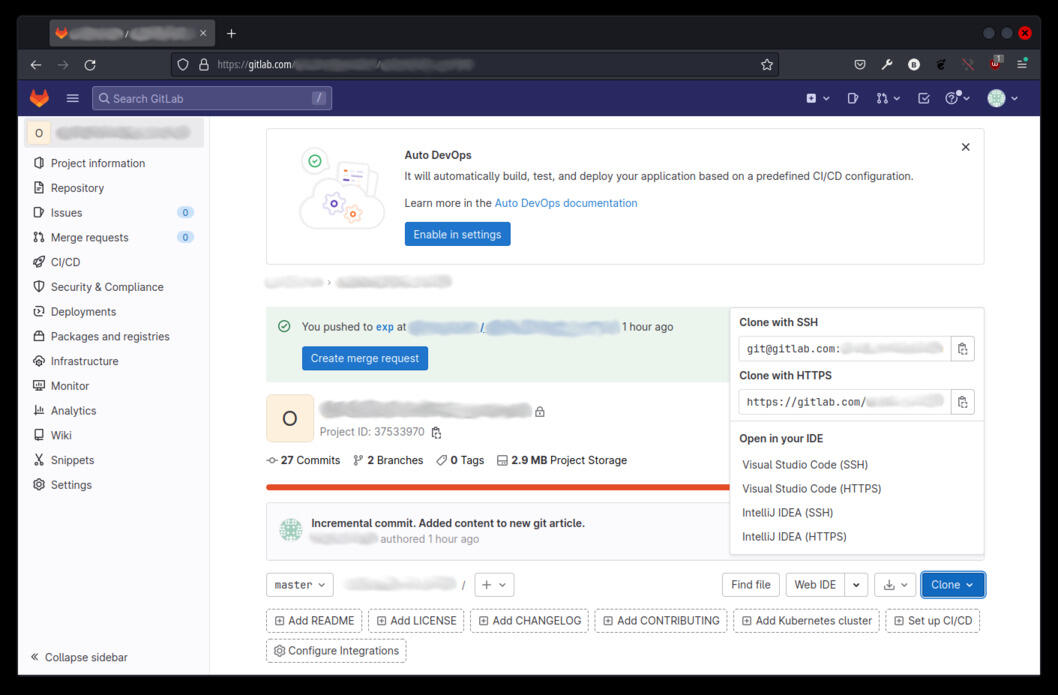
A GitLab Repository's Main Page Showing the SSH and HTTPS Identifiers
When the command is executed, if an argument that specifies a directory is not supplied, it will duplicate the remote repository in a new directory which it creates in the current directory, so the command should be executed from the directory that is to contain the new directory. The clone will include all branches of the repository, but when switching to the newly created directory, the default branch of the project will be checked out and its latest state will be activated as the working tree. The details of the command and the many variations in how it can perform the clone operation is viewable with git help clone.
If the hub is a GitLab server, the default branch should have been set previously. The current default branch setting can be viewed and modified in the web interface. The following image shows the project's settings page in the GitLab interface with default branch selection dropdown activated.
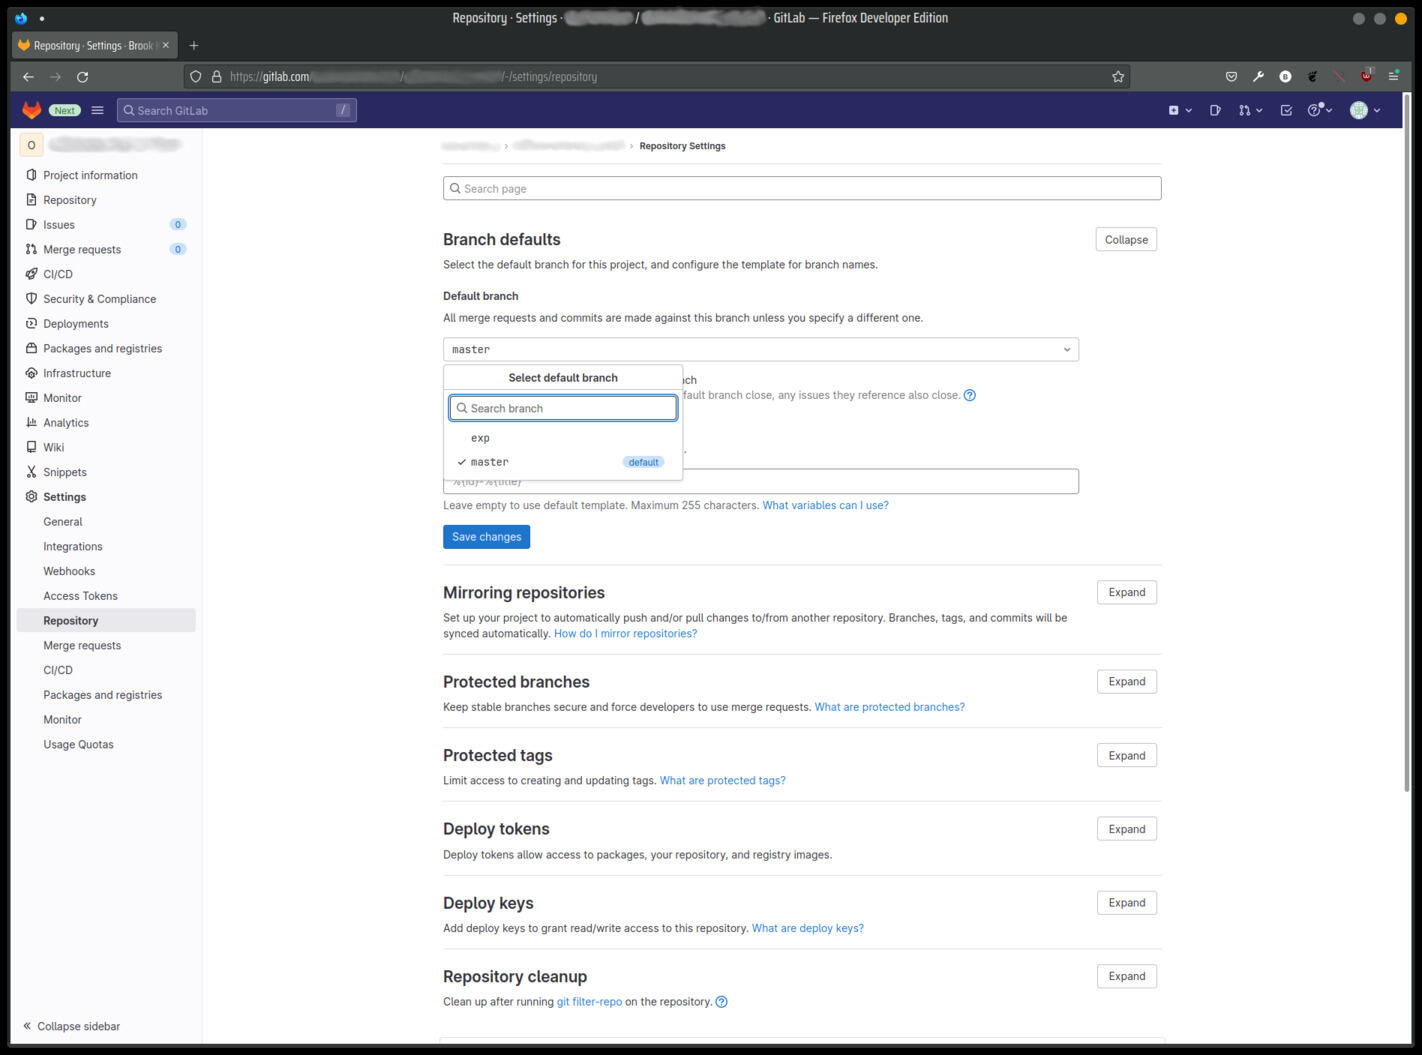
The Default Branch Setting in the GitLab Web Interface
We will use the ssh protocol based repository identifier -- recommended in GitLab documentation -- as an argument to the clone command as in:
git clone git@gitlab.com:user-name/repository-name.git
The following listing shows the command and its output.
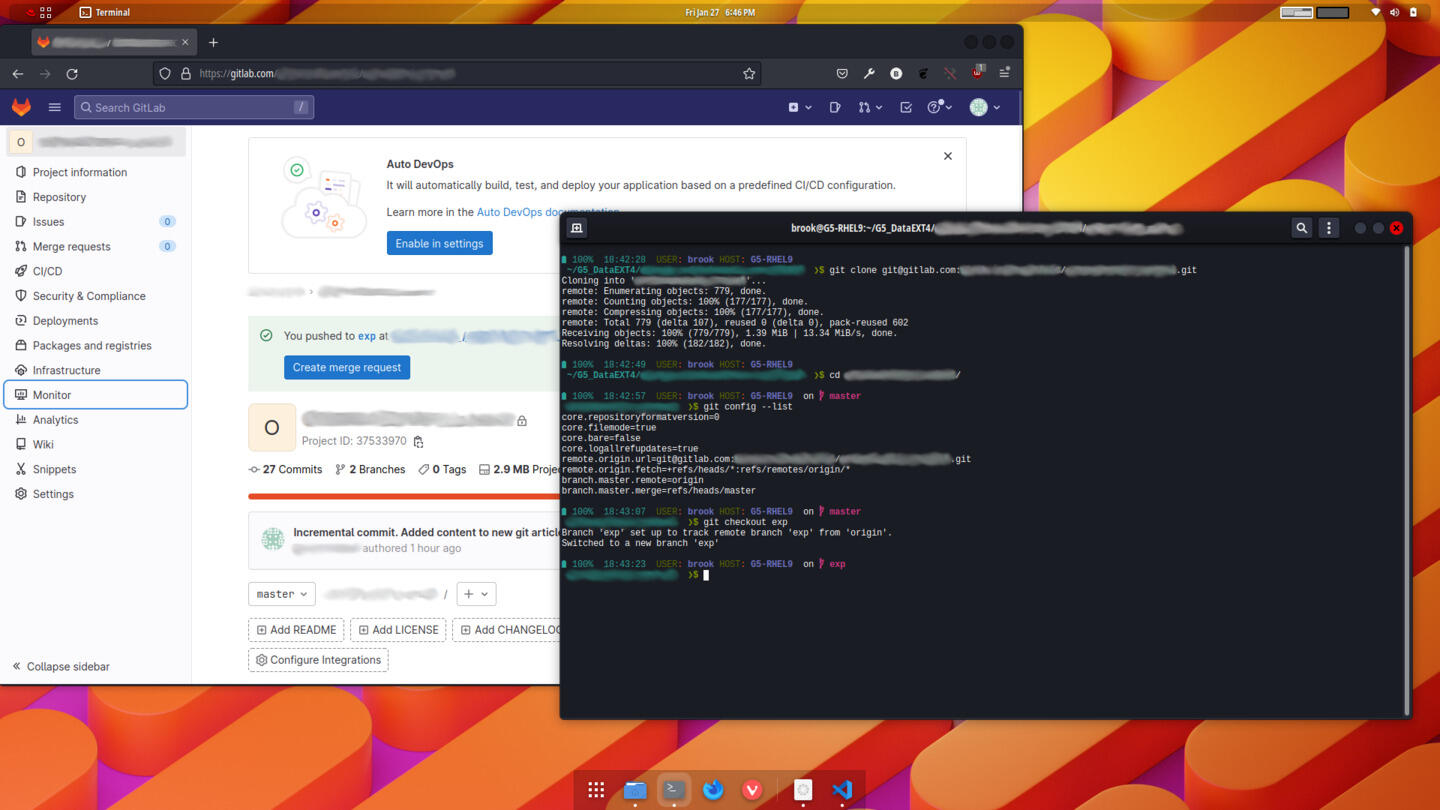
100% 18:42:28 USER: brook HOST: G5-RHEL9 ~/G5_DataEXT4/project_parent_directory ❯$ git clone git@gitlab.com:gitlab-individual-username/example_repository.git Cloning into 'example_repository'... remote: Enumerating objects: 779, done. remote: Counting objects: 100% (177/177), done. remote: Compressing objects: 100% (177/177), done. remote: Total 779 (delta 107), reused 0 (delta 0), pack-reused 602 Receiving objects: 100% (779/779), 1.39 MiB | 13.34 MiB/s, done. Resolving deltas: 100% (182/182), done.
To work on the repository we would need to cd to the newly created directory.
100% 18:42:49 USER: brook HOST: G5-RHEL9 ~/G5_DataEXT4/project_parent_directory ❯$ cd example_repository/
The following image shows a terminal in which the first command executed is the git clone command. After changing to the new directory created by the clone command, the Starship command prompt indicates that we are in a Git repository with the "master" branch checked out as the current branch; this is the default branch as set in GitLab. The next command shows some properties of the repository, and the following one changes the current branch to one named "exp".
At this point the repository on the new client node will be identical to those on the other client and the central server.
The local repository on the new client node can be viewed with the git config --list command, shown with its output in the newly cloned repository in the following listing. One notable omission from the output is user configuration, namely any user configuration. The reason for this and necessary actions are discussed below in the section Other Issues -> Local Git User Configuration.
100% 18:42:57 USER: brook HOST: G5-RHEL9 on master example_repository ❯$ git config --list core.repositoryformatversion=0 core.filemode=true core.bare=false core.logallrefupdates=true remote.origin.url=git@gitlab.com:gitlab-individual-username/example_repository.git remote.origin.fetch=+refs/heads/*:refs/remotes/origin/* branch.master.remote=origin branch.master.merge=refs/heads/master
Other Issues
Multiple Branches
In the previous image we saw that after switching to the new repository directory created by the clone command, the active brach is set to the master branch, the branch set as the default in the cloned repository, in this case the repository on the GitLab server. If the branch used to make new additions and modifications in the project is different from the default branch, as is the case in our example which uses an branch named exp instead of the default master, then that would need to be checked out after cloning to the new client node. This was also shown in the previous image.
100% 18:43:07 USER: brook HOST: G5-RHEL9 on master example_repository ❯$ git checkout exp Branch 'exp' set up to track remote branch 'exp' from 'origin'. Switched to a new branch 'exp'
origin/HEAD in New Client Node Repository
The output of the git log command, shown in the terminal window in the following image, indicates that the HEAD of each branch in the new client node repository and of each branch in the repository on the central server point to the same -- latest -- commit. The output also reveals one possibly unexpected item, that is a reference to a branch named origin/HEAD appears in the output on the new client node that does not appear when running git log in the original client node. This is the result of the clone operation and and represents the default branch, mentioned earlier, in the cloned repository. (See this stackoverflow discussion).
Local Git User Configuration
In the output of git config --list shown above, there was no user configuration. Typically, Git users set a global user configuration along with other global configuration items, which would be shown in the output. These items are not visible in the example output, however, because in my workflows, Git repositories use different identity settings, so I don't bother with global Git user configuration and only set local Git user configuration specific to each repository. In this case, before working in this repository local Git user configuration must be set, otherwise when attempting to make the first commit an error would occur with a message indicating the "Author identity" is unknown, as shown in the output of the commit command in the following image:
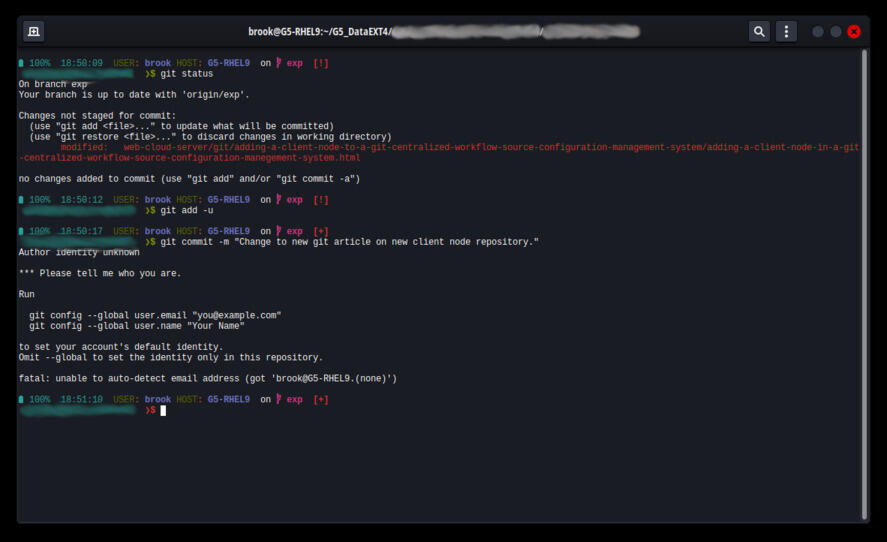
Error When Committing in a Repository Without User Configuration
In order to commit on the client node using a local Git user identity specific to the current repository, the configuration items user.email and user.name would need to be set using the command git config with the --local option as in:
brook … example_repository web-cloud-server git git config --local user.email "username@example-domain.com"
and
brook … example_repository web-cloud-server git git config --local user.name "Real Name"
After setting these items, they are included in the configuration list output, as shown below.
brook … example_repository web-cloud-server git git config --list core.repositoryformatversion=0 core.filemode=true core.bare=false core.logallrefupdates=true remote.origin.url=git@gitlab.com:gitlab-individual-username/example_repository.git remote.origin.fetch=+refs/heads/*:refs/remotes/origin/* branch.master.remote=origin branch.master.merge=refs/heads/master user.email=username@example-domain.com user.name=Real Name
Workflow
Once the repository is cloned on the new client node -- and the local repository specific user configuration is set, if desired or necessary for the project -- the distributed workflow is ready to be used. When beginning a session for the first time on either client node, since all instances of the repository -- on all clients and the central server are identical, the developer can make changes to the project immediately. But at the end of the first session, the project must be pushed to the central server in order to be available to be pulled from the central server at the beginning of the next session on other client. For example with:
git push origin exp
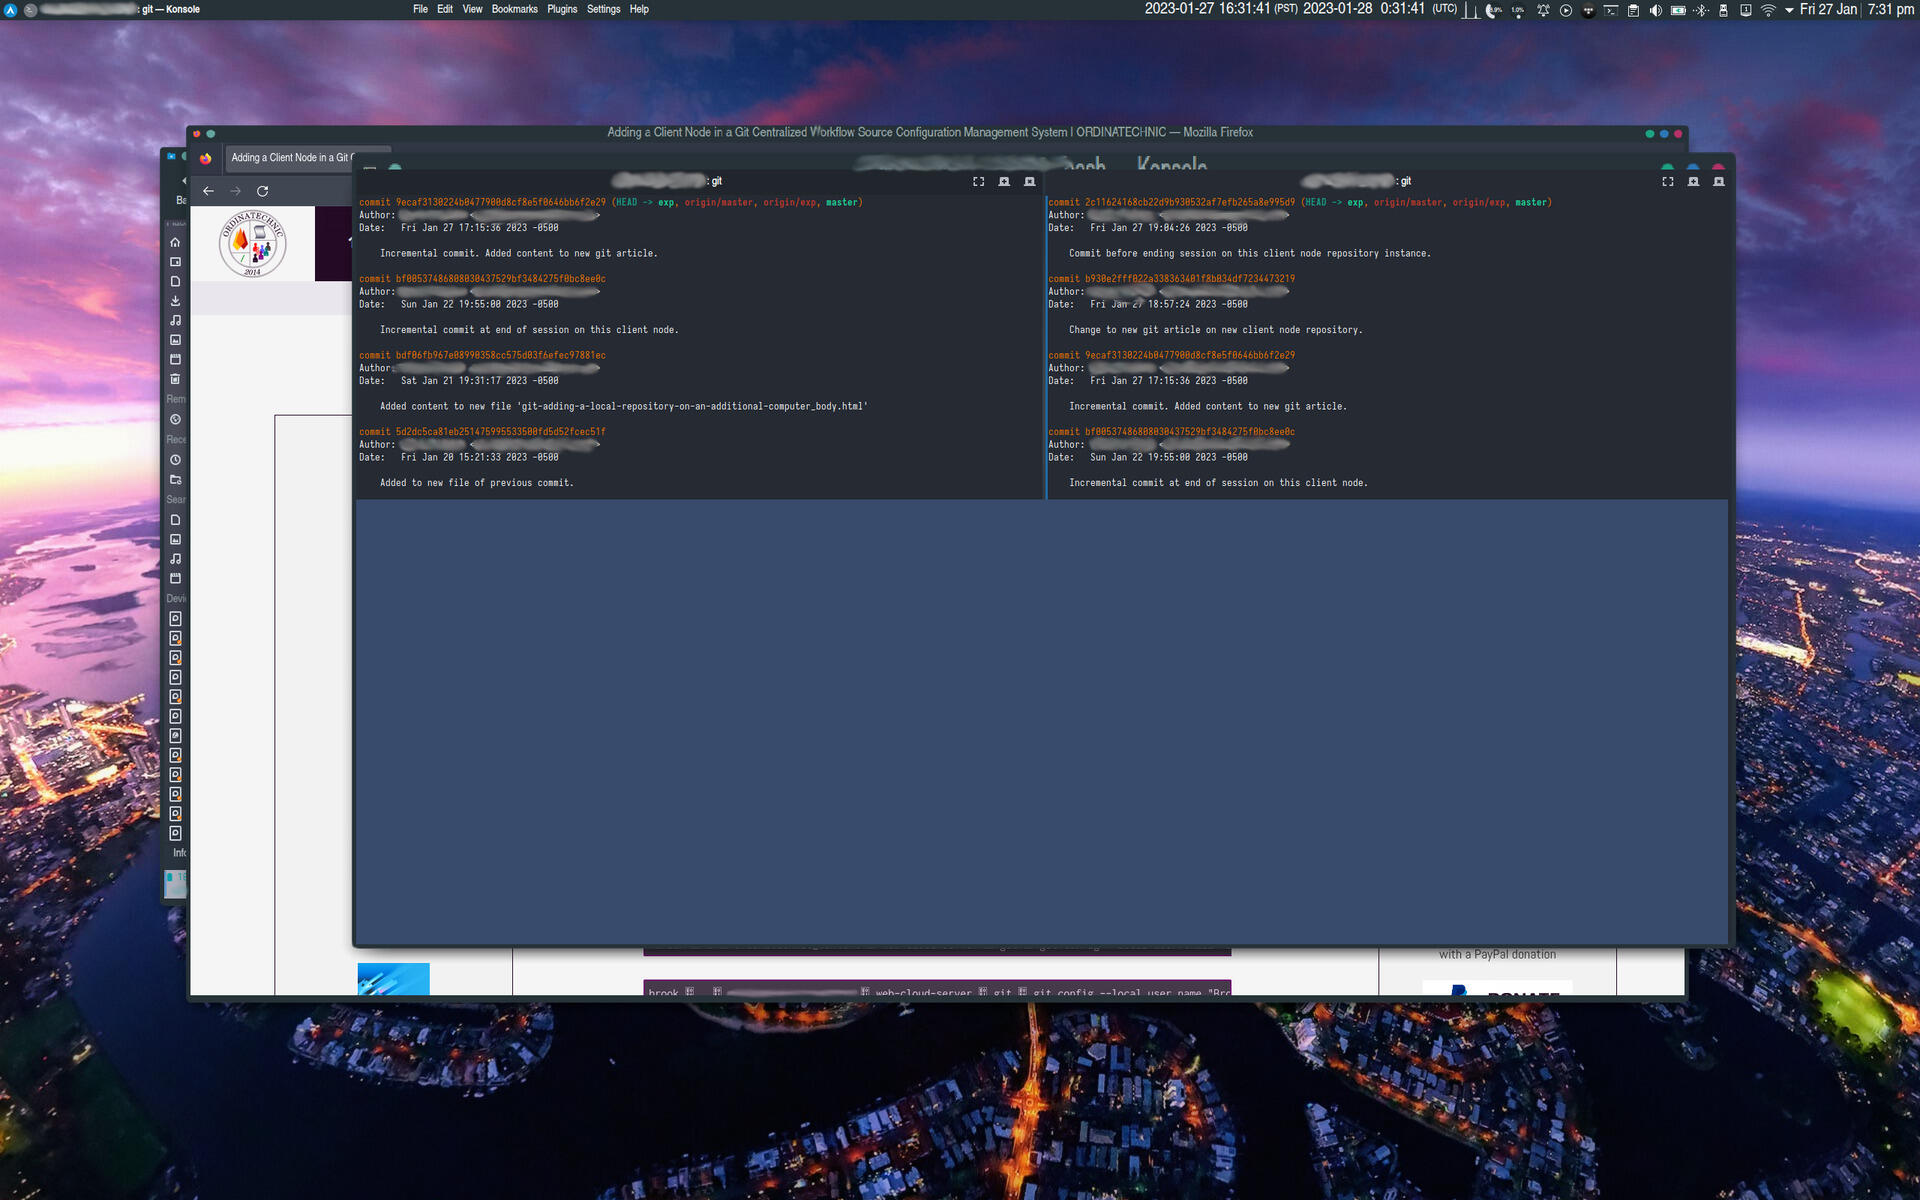
The following image of a terminal window shows the series of commands at the end of the session -- viewing the status of the repository after staging changes in tracked files (first command), committing (second command), pushing to the repository on the central server (third command), synchronizing the changes to the other branch (fourth command), and pushing the other branch to the central server (fifth command).
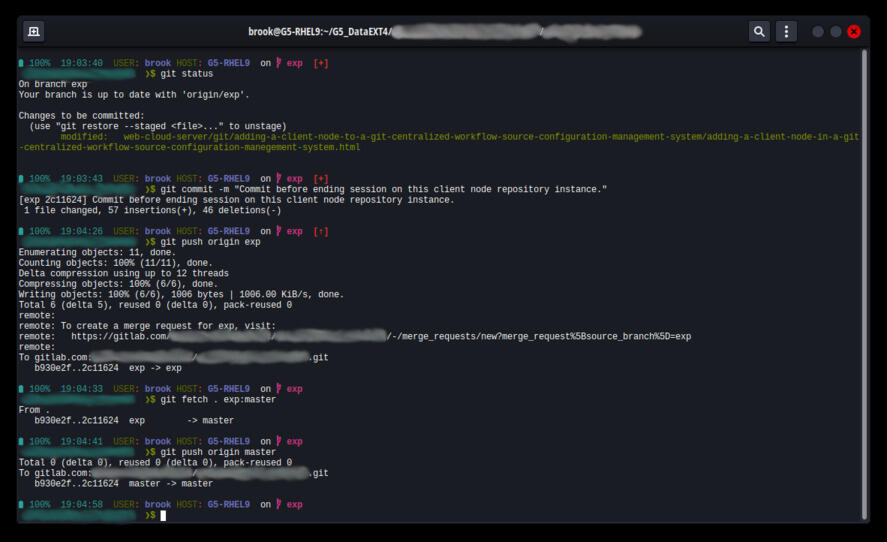
Committing and Pushing the Project to the Central Server Repository at the End of a Session on a Client Node
At the beginning of each subsequent session (if it is on a different client node than the previous session) the project must be pulled to the current client node, for example with:
git pull origin exp
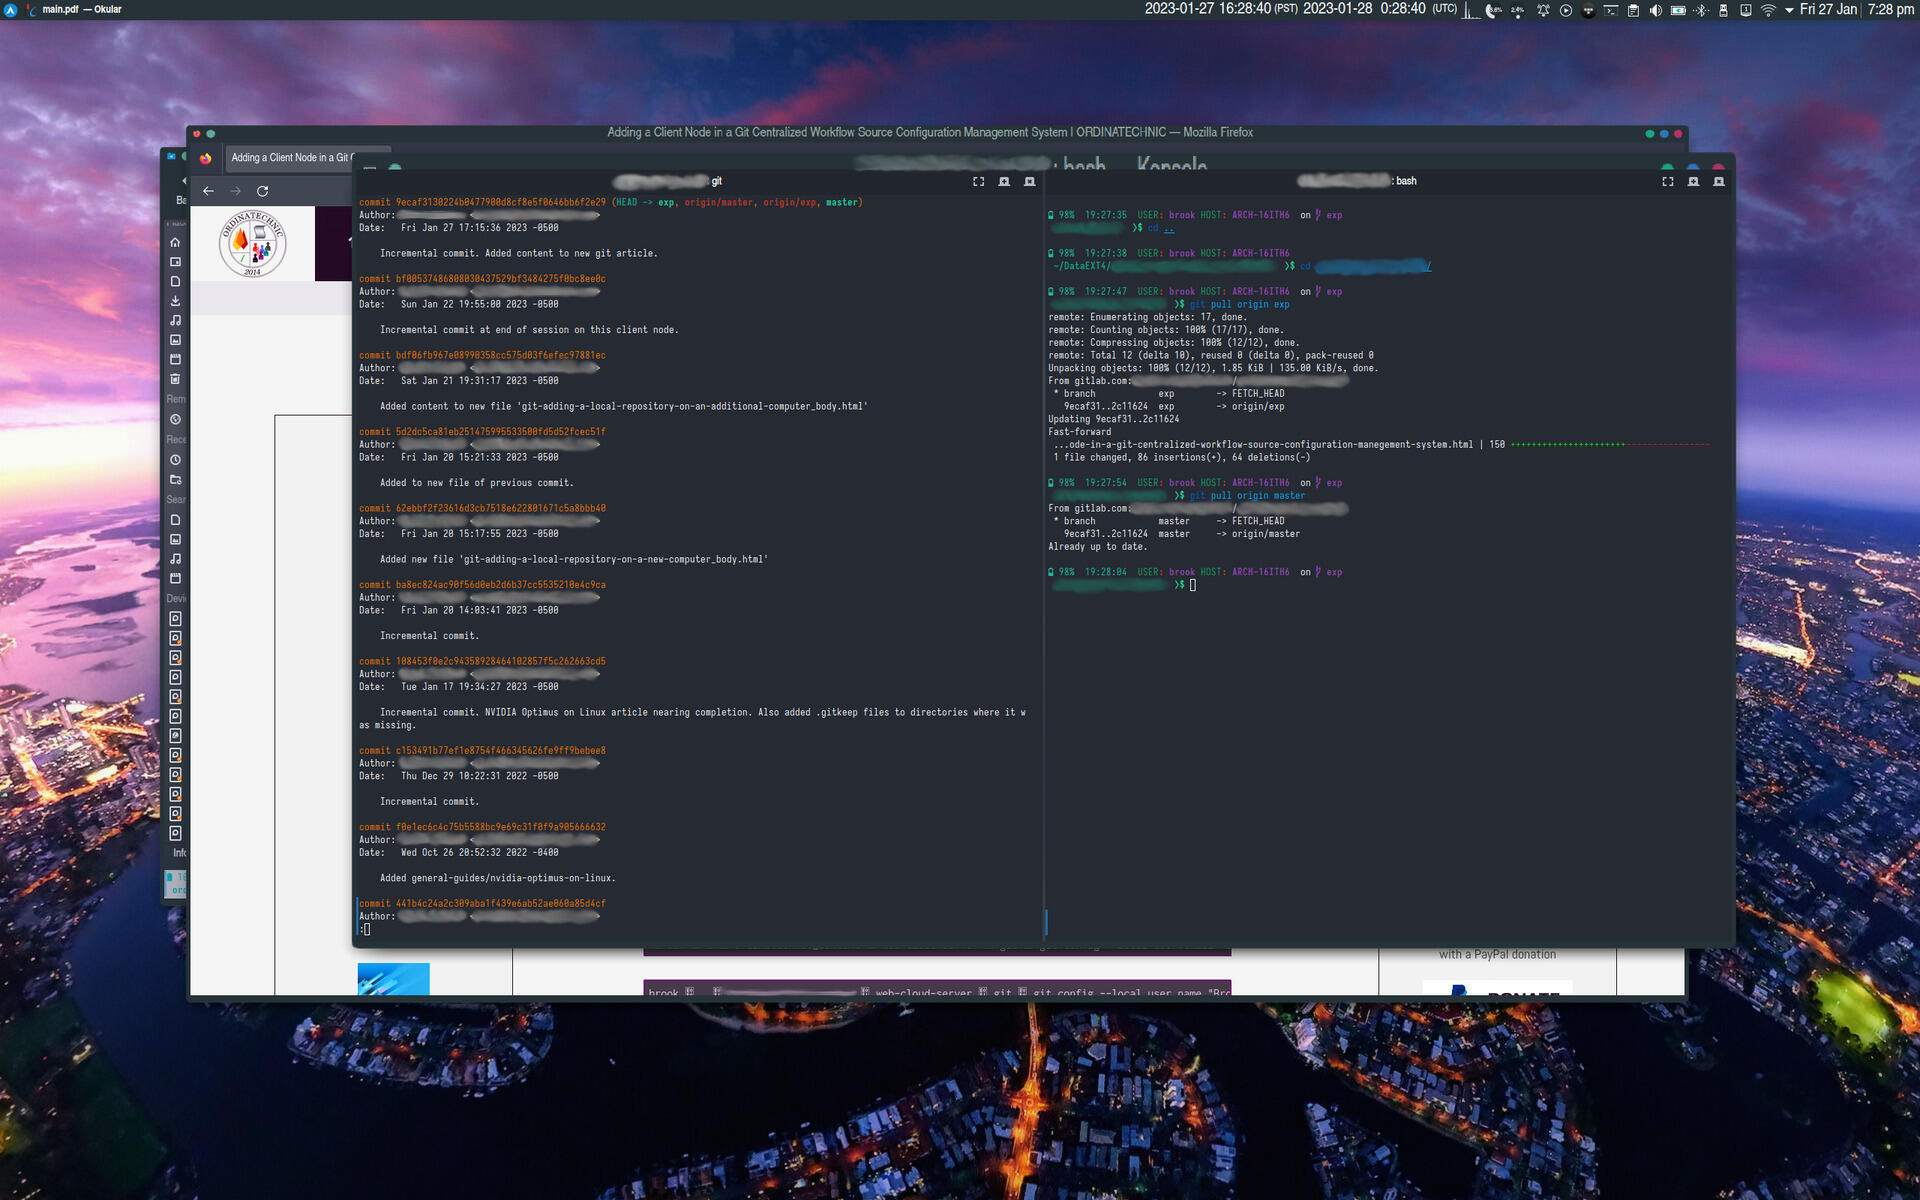
And at the end of each subsequent session on any client, the project must be pushed to the central server, again in order to be available to be pulled from the central server at the beginning of the next session on another client. The following set of images show the beginning of a session on a different client node from the previous session.
- Image 1
-
The first image shows a Konsole terminal split window with the left side showing the output of
git logreflecting the initial state of the repository; it is as it was the last time this client node was used and does not show recent commits on the other client node, which have also been pushed to the central server. The right pane shows pulling the project from the central server repository with thegit pullcommand -- something that needs to be done at the beginning of a session in the centralized distributed workflow for an individual developer with multiple machines. - Image 2
- In the second image, the left pane is the same as the previous image, but the right pane shows the effect of pulling the exp branch from the central repository from the central server. Two HEAD of the exp branch is now ahead by two commits. These are the commits that were made on the other client node, synchronized to the central server, and now after pulling from the central server are now incorporated into the repository on the current client. It also shows that the latest commit of the master branch is the same as before, as it was not pulled from the remote repository.
- Image 3
- In the right pane of the third image shows the state after the master branch has also been pulled from the central server.
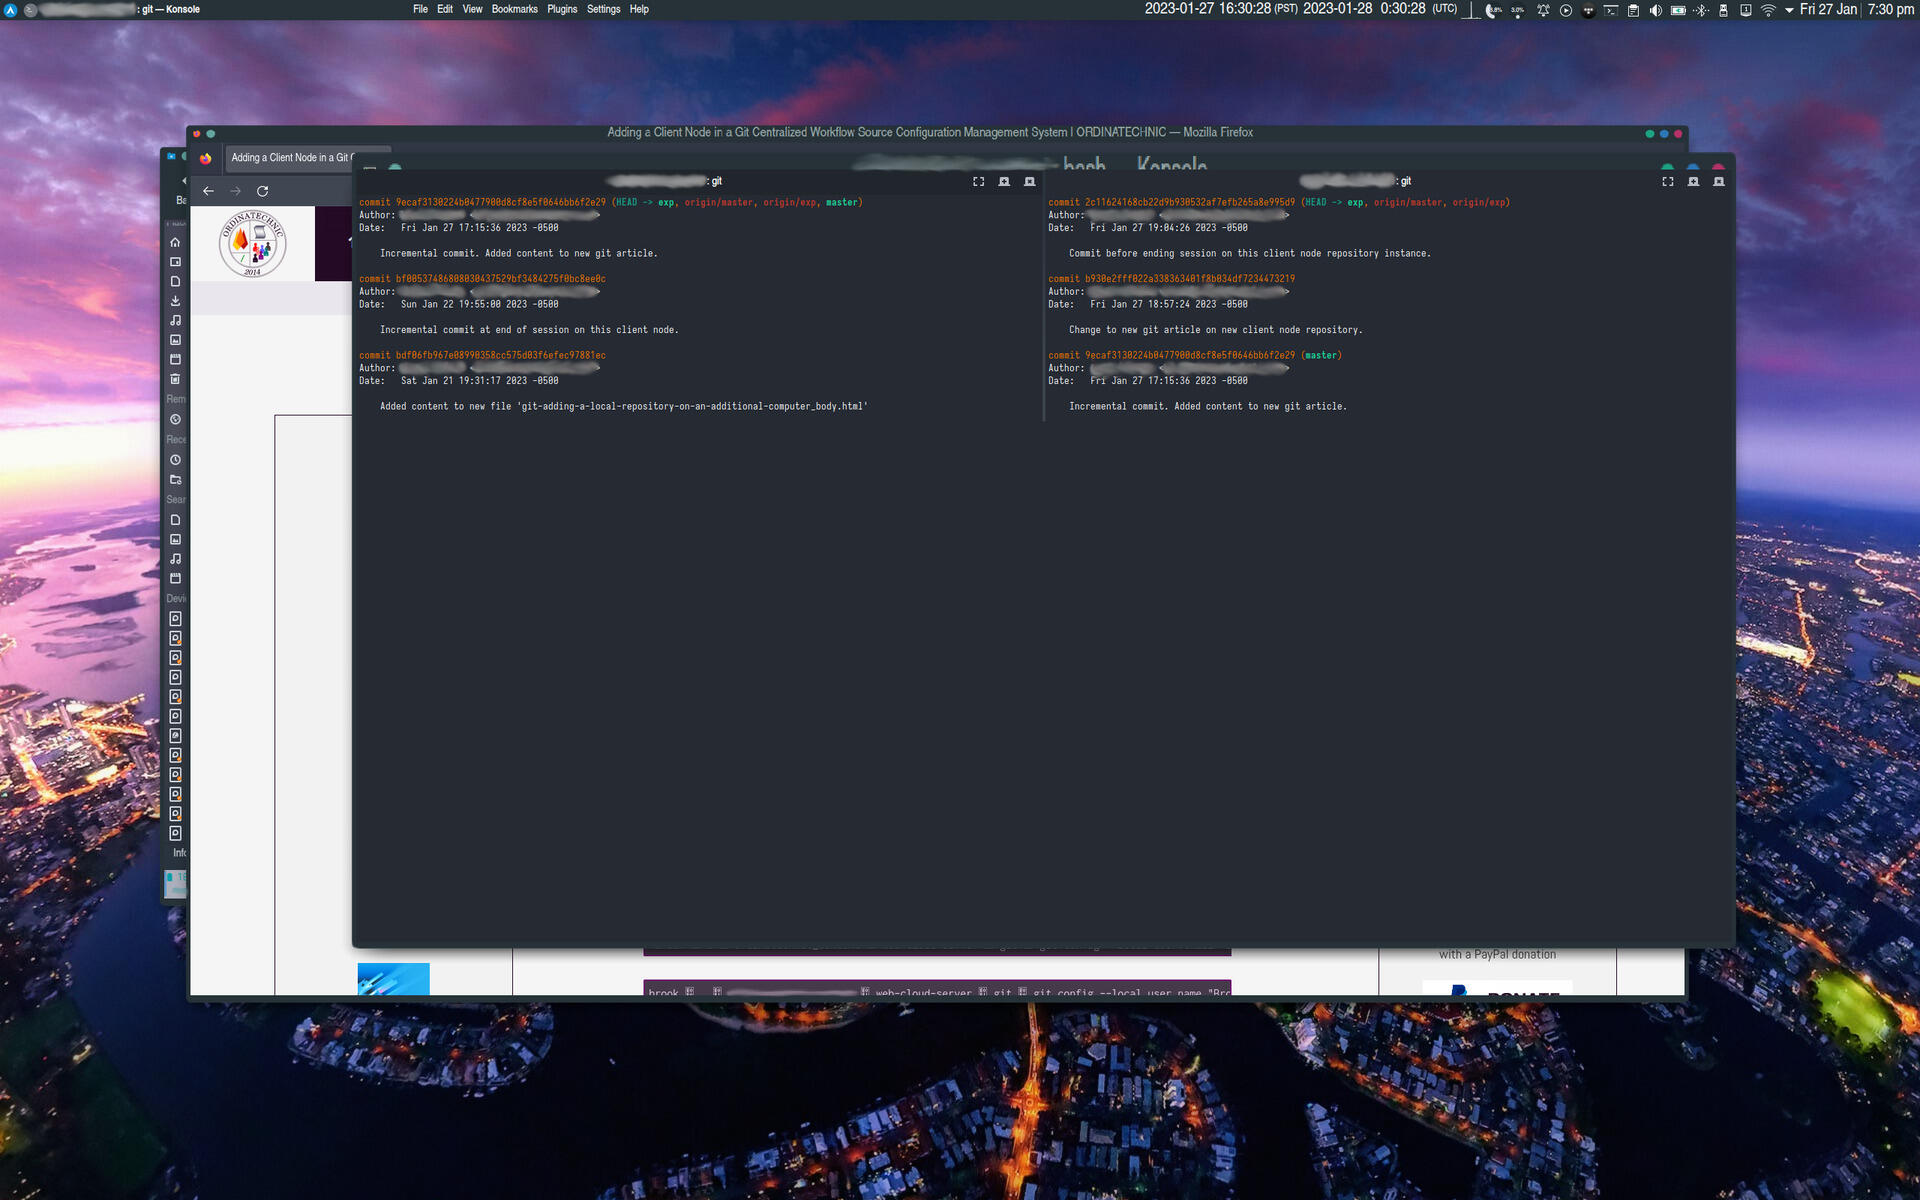
The Beginning of a Session on a Client Node
At the beginning of a centralized distributed workflow session on a client node, the project must be pulled from the central server repository. The project must have been pushed to the central server repository at the end of the previous session.
References
- Pro Git (Online Version) Section 5.1 Distributed Git - Distributed Workflows
- GitLab Documentation: Convert a local directory into a repository
- GitLab Documentation: Convert a local directory into a repository -> Add a remote
- GitLab Documentation: Create a project -> Create a blank project
- GitLab Documentation: Create a project -> Create a new project with Git push
- GitLab Documentation: Git on the command line, Clone a repository
- GitLab Documentation: Default branch
Notes:
- [1]
This step is strictly not necessary as changes can be synchronized among all clients and the central server at some future time. If there are no conflicting differences between the versions of the repository on the various computers, this is not difficult. However if there are conflicting differences between the various versions of the repositories on the various nodes and central server, the differences must be reconciled before all nodes and the central server can be synchronized.
↩