Introduction
Network File System (NFS) is a protocol that allows a host to share directories -- export directories, in NFS terminology -- with remote hosts such that the remote host can mount the exported directories -- import the directories -- as if they were on local storage. The system is a network client/server architecture, where the exporting host is the server and the remote hosts are clients.
After installation and configuration, with appropriate services running and necessary ports open, the essence of the system is the specification on the NFS server of the directories to share and the remote client hosts which can access the shared directories, along with NFS operation options, in the file /etc/exports. This specification in /etc/exports is in a format such as
/exported/directory remote-host(option1,option2,optionN)
For example, the /etc/exports file could contain the line:
/home/brook/DataEXT4/SoftwareDownloads/RockyLinux 192.168.56.103(sync,wdelay,hide,no_subtree_check,sec=sys,ro,secure,root_squash,no_all_squash)
which exports the directory /home/brook/DataEXT4/SoftwareDownloads/RockyLinux allowing only the remote host at 192.168.56.103 to import the exported directory, further specifying that NFS should operate for this particular remote host with the NFS options listed in the parentheses immediately following the remote host's IP address.
The NFS client can import the directory exported by the NFS server by mounting it locally with a mount command in the form of
mount server-identification:/path/of/exported/directory /path/of/local/mount/point
For example,
sudo mount ARCH-16ITH6.localdomain:/home/brook/DataEXT4/SoftwareDownloads/RockyLinux /mnt/hostnfs/
mounts the directory /home/brook/DataEXT4/SoftwareDownloads/RockyLinux exported by the server identified by the FQDN ARCH-16ITH6.localdomain at the local filesystem hierarchy path /mnt/hostnfs/.
NFS has been useful for decades since its development by Sun Microsystems and release in 1984, allowing, for example, at a site like a university with networks of UNIX computers, users to log in to any UNIX workstation and have their home directory -- which would actually be on a remote server -- always available on the local host as an NFS import. It remains useful today, for example, in automated installations of Red Hat Enterprise Linux, where the installation image and the installation configuration can be stored on an NFS server (see ).
It is also useful in sharing directories between a VirtualBox host and a VirtualBox guest VM, if this method is preferred over other sharing methods provided by the hypervisor, namely the shared folder functionality provided by VirtualBox Manager. The example mentioned above of NFS used in automated installation is also relevant in a virtualization use case, where the installation is in a virtual machine, and the VirtualBox Manager built-in capability of shared folders is not possible before the guest OS has been installed in the virtual machine. In demonstrates an installation of Rocky Linux -- a RHEL clone -- in a VirtualBox VM where the installation image is stored on the VM host and the installation configuration is stored on another VirtualBox guest and NFS is used to access both during the installation.
NFS In the virtualization use case NFS can also be used to share directories, not from VM host to guest, but among the VirtualBox guests directly, a functionality that VirtualBox Manager does not provide.
This article describes the basic configuration of an NFS server on a physical computer so that an exported directory from the physical computer can be imported by VirtualBox guest VMs through a VirtualBox host-only network. The configuration of an NFS client is also described. (For more details on the architecture of NFS and relevant concepts, see Introduction to Network File System (NFS)) The actual relationship of physical computers and virtual machines used in this article is shown in the image below.

Configuration of VirtualBox Guest VMs Sharing Physical Host Directories Using NFS
VirtualBox Host-Only Networking
VirtualBox makes available various networking modes for network communication between the VM host and VM guests, between the VM guests, and between the VMs and other hosts on the Internet. The modes are summarized in the table below, adapted from a similar table in the VirtualBox user manual.
| Service |
NFSv3 |
NFSv4 |
| nfs |
2049 TCP/UDP |
2049 TCP |
| rpcbind |
111 TCP/UDP |
N/A |
| mountd |
20048 TCP/UDP |
N/A |
The manual states that a host-only network
can be used to create a network containing the host and a set of virtual machines, without the need for the host’s physical network interface. Instead, a virtual network interface, similar to a loopback interface, is created on the host, providing connectivity among virtual machines and the host.
By default when a VM is created in VirtualBox, only a NAT network is enabled, routing internet traffic through NAT to/from the VM using the VM host's network interface. In order to have a host-only network be available for communication between the host and the VMs and between the VMs,
-
a host-only network must be created in VirtualBox Manager, the main VirtualBox user interface used to manage all VMs
-
an additional adapter must be created in a specific VMs network settings and attached to the host-only network (or the existing default adapter changed from being attached to a NAT network to the host-only network, but this will prevent the VM from accessing the internet)
The VirtualBox host-only network can be created by first accessing the Host Network Manager item from the FIle menu of the VirtualBox Manager, shown below in the Global Menu of the Plasma Desktop.
The Host Network Manager window that opens (see following set of images) allows managing VirtualBox networks and viewing their properties. The window is divided into two major areas, a top pane that lists the existing networks, and a bottom pane where the properties of a network selected in the top pane can be viewed or modified. When opening the Host Network Manager window the first time, one network should already be listed -- vboxnet1. This network is the default NAT network which is automatically enabled for use by each VM. Selecting vboxnet1 -- or any other network listed in the top pane (after it is created) -- and ensuring the "Properties" toolbar button is active will show the properties of the network in the bottom pane in two tabs, "Adapter" and "DHCP Server".
Clicking the "Create" toolbar button will add another network named vboxnet0 -- the one we will use for the host-only network. The IP addresses in this network is shown in top pane, under the column "IPv4 Address/Mask" (Image 1 in the following set of images) in CIDR notation as 192.168.56.1/24 . Activating the "Enable" checkbox under the column "DHCP Server" on the line corresponding to "vboxnet0" will enable automatic assignment of IP addresses for the VM guests, with 192.168.56.101 assigned to the first VM created and each subsequent VM created assigned an IP address incremented by 1, up to 192.168.56.254.
After creating "vboxnet0 " it will be automatically selected in the top pane, with its properties displayed in the bottom pane. The "Adapter" tab of the properties pane shows the IP address that will be assigned to the VM host in the VirtualBox host-only network in the field labeled "IPv4 Address", i.e., the IP address to use to communicate to the VM host from the VM guests. We will use this as the IP address of the NFS server for access by VM guests acting as NFS clients. The "Configure Adapter Manually" radio button will be activated, but it can be left as is. In Automated Installation of Rocky Linux (RHEL) Using Kickstart with Installation Source and Kickstart on NFS, the installation on a virtual machine accessed an NFS server on the physical host for the installation source at this IP address through the VirtualBox host-only network.
While the "vboxnet0 " network is highlighted in the top pane, the "DHCP Server" tab of the properties pane shows the possible range of host-only network IP addresses that will be assigned to the VMs (Image 2 in the following set of images). The lower limit of the range is indicated in the field labeled "Lower Address Bound" with the value 192.168.56.101, and the upper limit of the range is in the field labeled "Upper Address Bound" with the value 192.168.56.254. In Automated Installation of Rocky Linux (RHEL) Using Kickstart with Installation Source and Kickstart on NFS, the installation on a virtual machine accessed an NFS server on another VM for the kickstart file at an IP address in this range through the VirtualBox host-only network.
Creating Networks and Viewing Network Properties in VirtualBox Manager
The image shows the "Host Network Manager" opened from VirtualBox Manager's "File" menu.
After creating a host-only network in VirtualBox Manager an additional network adapter to connect to the host-only network must be created in the "Network" section of each VM's settings, which can be accessed by selecting the VM in the VM list in VirtualBox Manager and clicking the "Settings" button (see Image 1 in the following set). The network settings can also be set in the initial series of dialogs when creating the VM. The first image in the following set of slides shows the adapter available to the VM by default when a VM is created, in the "Adapter 1" tab. It is attached to the NAT network allowing the VM to access the internet.
For each VM that is to access the host-only network, an additional adapter must be enabled. This can be done by activating the "Adapter 2" tab, then ensuring the "Enable Network Adapter" checkbox is activated and "Attached to:" dropbox is set to "Host-only Adapter" (see Image 2 of the following set).
Creating and Attaching Network Adapters in A VMs Settings to Connect to the VirtualBox Host-Only Network
The visibility of the host-only network in the VMs and the host is depicted in the following image that shows the output of ip addr show in a VM and on the physical host. The top pane of the Konsole window is an SSH connection to a VM (which is accessed at IP address 192.168.56.101 through the host-only network) and the bottom pane is the physical host. The output in the VM shows two ethernet adapters, enp0s3 and enp0s8 -- the two adapters shown in the VM's network settings -- the second of which, with the address 192.168.56.101, is the one attached to the host-only network.
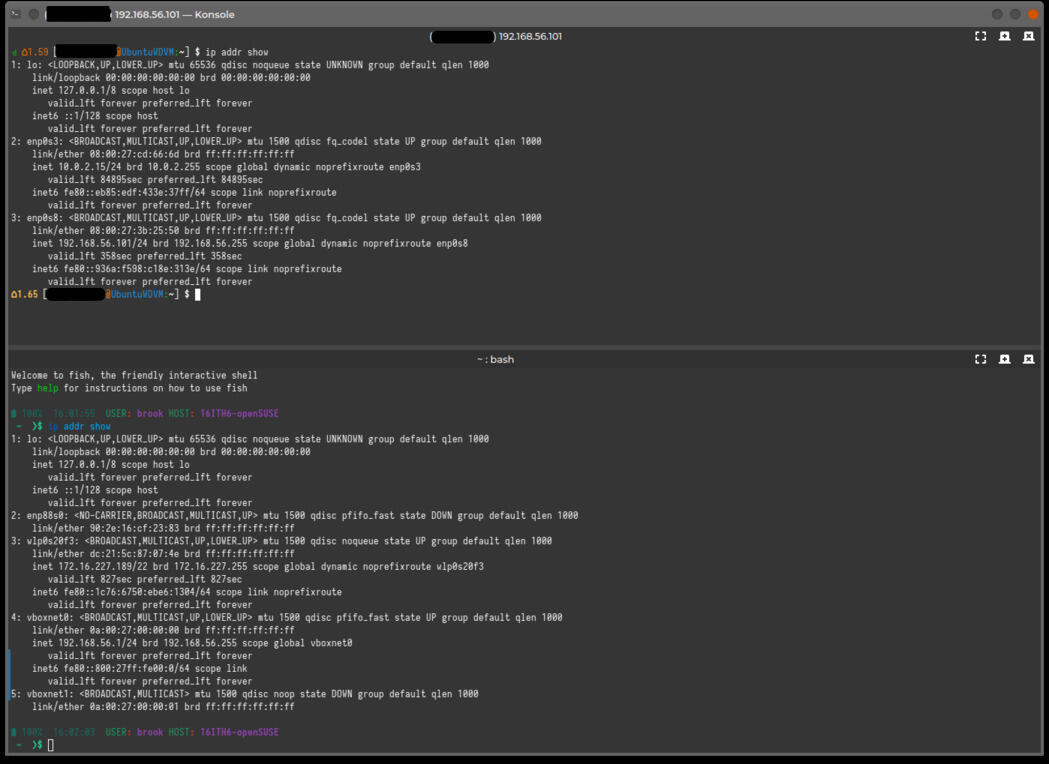
The Configuration of the VirtualBox Host(s) and Guest VMs.
The output of ip addr show on the physical host shows the two VirtualBox networks vboxnet0 and vboxnet1. vboxnet0 on the physical host has a host-only address of 192.168.56.1.
Installing NFS Server on VM Host
NFS functionality is provided by a kernel module, nfsd, working together with various user-space remote procedure call (RPC) and other programs (see Introduction to Network File System (NFS)). Only the necessary user-space components must be installed to provide an NFS server.
In some distributions, the package that contains these user-space components is in a package named nfs-utils; this is the case in Red Hat Enterprise Linux as well as Arch Linux. In these distributions, installing this package will complete the installation of an NFS server.
In some other distributions, the package that contains the NFS user-space components is nfs-kernel-server; this is the case in openSUSE and Ubuntu. In these distributions installing this package will complete the installation of an NFS server.
Below are two examples of installation and configuration of an NFS server, one in Arch Linux which provides an nfs-utils package and another in openSUSE Tumbleweed which provides the nfs-kernel-server package. These distribution's installed on the physical VM host are used in the demonstration of using NFS to share directories in a VM host with VM guests.
openSUSE
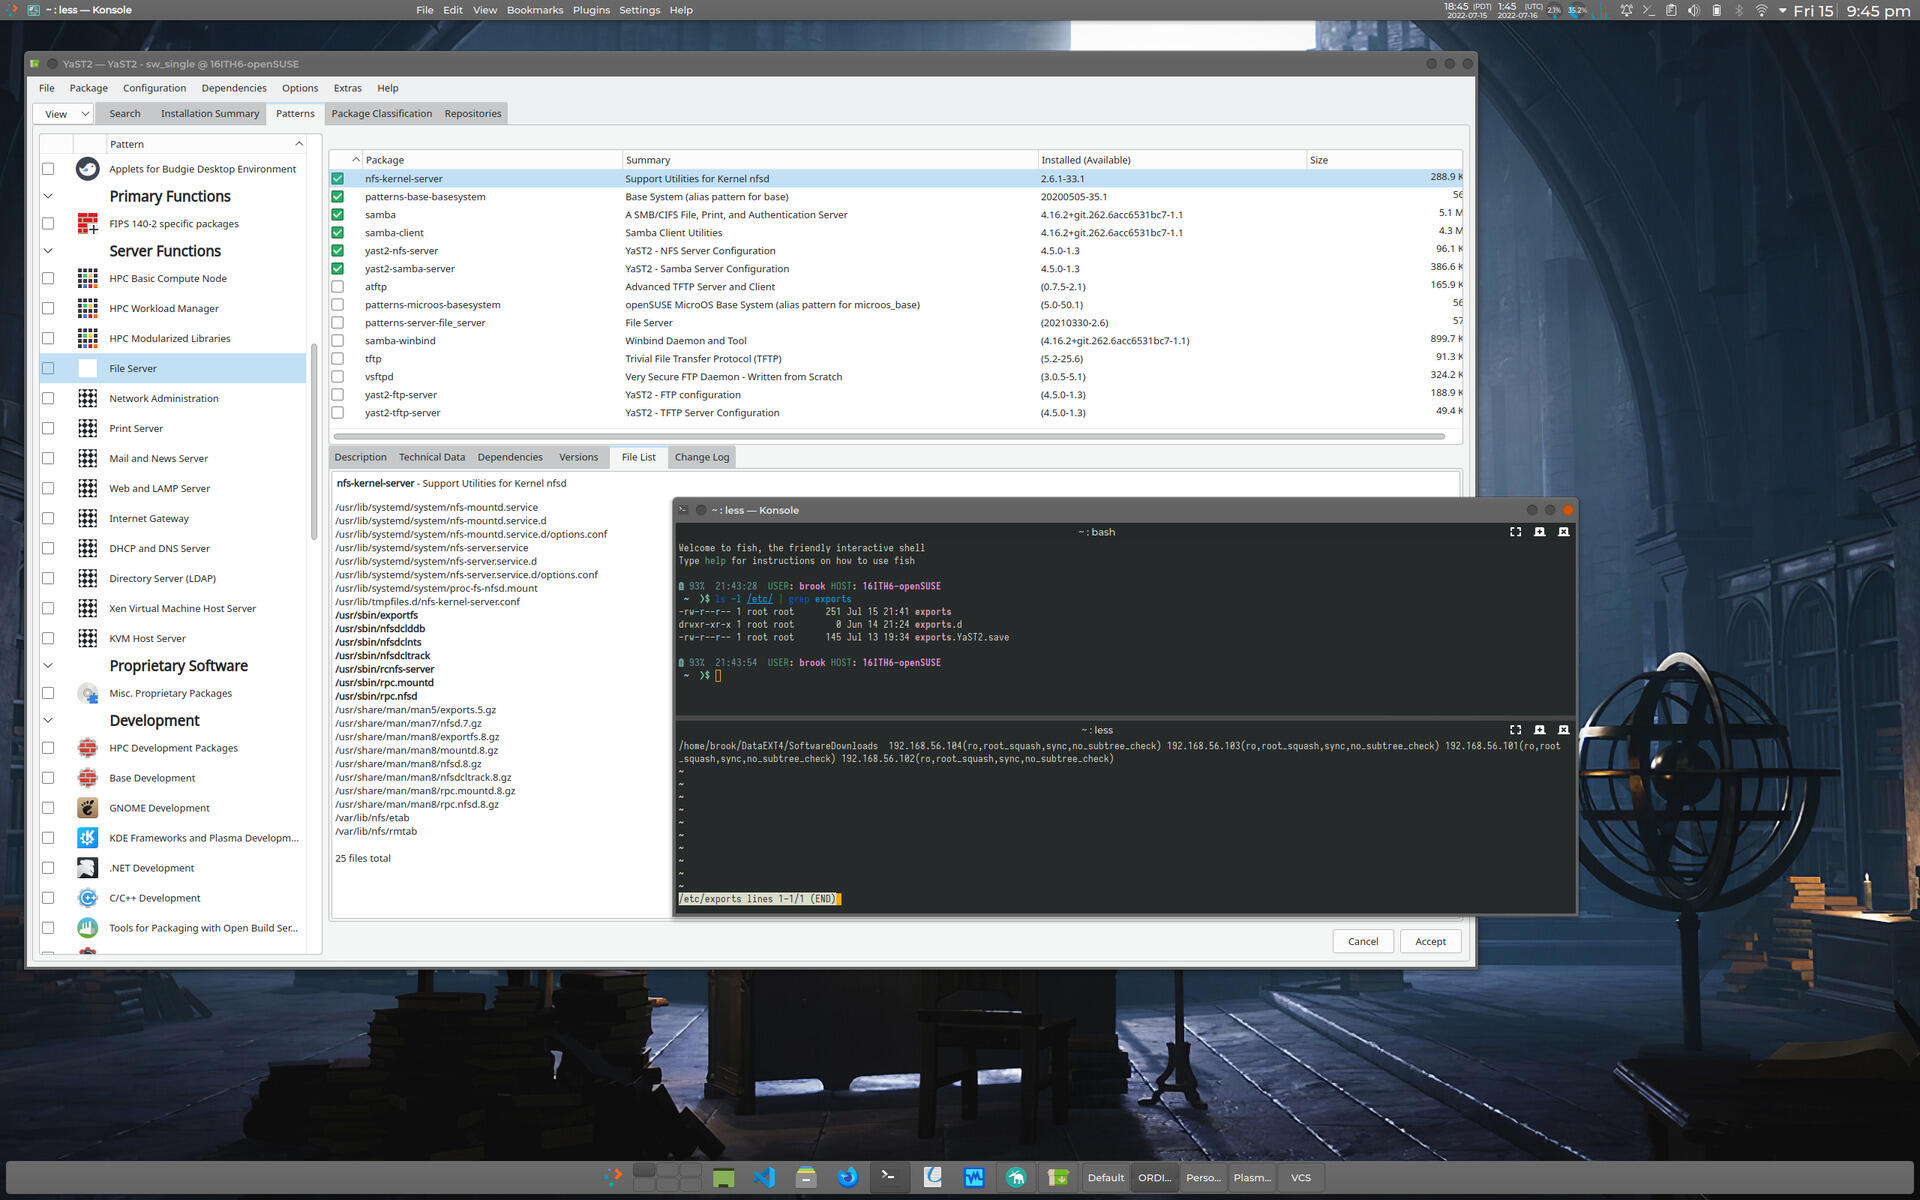
The openSUSE Reference manual suggests installing an NFS server (the user-space components) by using the Software Management component of YaST and selecting the Patterns tab and activating the checkbox for File Server on the left pane, then initiating the package management transaction by clicking the "Accept" button (see the following set of images). This installs not only the package required for NFS server functionality, nfs-kernel-server, but other file sharing server applications such as ATFTP, TFTP, and VSFTP, in addition to Samba, which is installed by default in openSUSE.
Instead, if these other capabilities are not required, NFS server functionality can be enabled by installing the nfs-kernel-server package and -- in order to configure NFS with YaST -- the yast2-nfs-server package. This alternative installation can be performed by selecting the File Server option but NOT activating its checkbox in the left tab of the Patterns view and selecting only the nfs-kernel-server and yast2-nfs-server packages in the right pane, then clicking Accept. These packages can also be installed using openSUSE's CLI package management program zypper with the command
zypper in nfs-kernel-server yast2-nfs-server
The first image of the following set, which depicts the YaST Software Management module's Patterns view when the File Server options is selected (not activated), shows the packages that are components of the "File Server" pattern. The second image shows that the netcfg and nfs-client packages are dependencies of nfs-kernel-server (these are listed in the bottom-right pane, in the "Dependencies" tab). netcfg is installed by default in an openSUSE system, and provides the NFS server configuration file /etc/exports in addition to all network related configuration files, such as /etc/hosts, as shown in the fourth image. nfs-client provides NFS client capabilities. That /etc/exports is owned by a general package that provides all network configuration files instead of the package that provides the network service is a notable difference compared to other distributions.
NFS Related Packages in openSUSE
Click on any of the thumbnails to view a slideshow of the images.
Arch
In Arch Linux the NFS server user-space components are in the package nfs-utils. Installing this package will with the following command will complete the installation of an NFS server.
pacman -S nfs-utils
Installation of this package provides the primary configuration file, /etc/exports, other configuration files, the user-space programs, manual pages, as well other files, as shown in the listing below.
51% 21:36:18 USER: brook HOST: ARCH-16ITH6
~ ❯$ pacman -Qlq nfs-utils
/etc/
/etc/exports
/etc/exports.d/
/etc/nfs.conf
/etc/nfsmount.conf
/etc/request-key.d/
/etc/request-key.d/id_resolver.conf
/usr/
/usr/bin/
/usr/bin/blkmapd
/usr/bin/exportfs
/usr/bin/mount.nfs
/usr/bin/mount.nfs4
/usr/bin/mountstats
/usr/bin/nfsconf
/usr/bin/nfsdcld
/usr/bin/nfsdclddb
/usr/bin/nfsdclnts
/usr/bin/nfsdcltrack
/usr/bin/nfsidmap
/usr/bin/nfsiostat
/usr/bin/nfsstat
/usr/bin/nfsv4.exportd
/usr/bin/rpc.gssd
/usr/bin/rpc.idmapd
/usr/bin/rpc.mountd
/usr/bin/rpc.nfsd
/usr/bin/rpc.statd
/usr/bin/rpcdebug
/usr/bin/showmount
/usr/bin/sm-notify
/usr/bin/start-statd
/usr/bin/umount.nfs
/usr/bin/umount.nfs4
/usr/lib/
/usr/lib/systemd/
/usr/lib/systemd/system-generators/
/usr/lib/systemd/system-generators/nfs-server-generator
/usr/lib/systemd/system-generators/rpc-pipefs-generator
/usr/lib/systemd/system/
/usr/lib/systemd/system/auth-rpcgss-module.service
/usr/lib/systemd/system/nfs-blkmap.service
/usr/lib/systemd/system/nfs-client.target
/usr/lib/systemd/system/nfs-idmapd.service
/usr/lib/systemd/system/nfs-mountd.service
/usr/lib/systemd/system/nfs-server.service
/usr/lib/systemd/system/nfs-utils.service
/usr/lib/systemd/system/nfsdcld.service
/usr/lib/systemd/system/nfsv4-exportd.service
/usr/lib/systemd/system/nfsv4-server.service
/usr/lib/systemd/system/proc-fs-nfsd.mount
/usr/lib/systemd/system/rpc-gssd.service
/usr/lib/systemd/system/rpc-statd-notify.service
/usr/lib/systemd/system/rpc-statd.service
/usr/lib/systemd/system/rpc_pipefs.target
/usr/lib/systemd/system/var-lib-nfs-rpc_pipefs.mount
/usr/share/
/usr/share/doc/
/usr/share/doc/nfs-utils/
/usr/share/doc/nfs-utils/NEWS
/usr/share/doc/nfs-utils/README
/usr/share/doc/nfs-utils/README.systemd
/usr/share/man/
/usr/share/man/man5/
/usr/share/man/man5/exports.5.gz
/usr/share/man/man5/nfs.5.gz
/usr/share/man/man5/nfs.conf.5.gz
/usr/share/man/man5/nfsmount.conf.5.gz
/usr/share/man/man7/
/usr/share/man/man7/nfs.systemd.7.gz
/usr/share/man/man7/nfsd.7.gz
/usr/share/man/man8/
/usr/share/man/man8/blkmapd.8.gz
/usr/share/man/man8/exportd.8.gz
/usr/share/man/man8/exportfs.8.gz
/usr/share/man/man8/gssd.8.gz
/usr/share/man/man8/idmapd.8.gz
/usr/share/man/man8/mount.nfs.8.gz
/usr/share/man/man8/mountd.8.gz
/usr/share/man/man8/mountstats.8.gz
/usr/share/man/man8/nfsconf.8.gz
/usr/share/man/man8/nfsd.8.gz
/usr/share/man/man8/nfsdcld.8.gz
/usr/share/man/man8/nfsdclddb.8.gz
/usr/share/man/man8/nfsdclnts.8.gz
/usr/share/man/man8/nfsdcltrack.8.gz
/usr/share/man/man8/nfsidmap.8.gz
/usr/share/man/man8/nfsiostat.8.gz
/usr/share/man/man8/nfsstat.8.gz
/usr/share/man/man8/nfsv4.exportd.8.gz
/usr/share/man/man8/rpc.gssd.8.gz
/usr/share/man/man8/rpc.idmapd.8.gz
/usr/share/man/man8/rpc.mountd.8.gz
/usr/share/man/man8/rpc.nfsd.8.gz
/usr/share/man/man8/rpc.sm-notify.8.gz
/usr/share/man/man8/rpc.statd.8.gz
/usr/share/man/man8/rpcdebug.8.gz
/usr/share/man/man8/showmount.8.gz
/usr/share/man/man8/sm-notify.8.gz
/usr/share/man/man8/statd.8.gz
/usr/share/man/man8/umount.nfs.8.gz
/var/
/var/lib/
/var/lib/nfs/
/var/lib/nfs/etab
/var/lib/nfs/rmtab
/var/lib/nfs/rpc_pipefs/
/var/lib/nfs/sm.bak/
/var/lib/nfs/sm/
/var/lib/nfs/state
/var/lib/nfs/v4recovery/
51% 21:36:21 USER: brook HOST: ARCH-16ITH6
~ ❯$
Prerequisites to Configuration of NFS Server on VM Host
Before configuring the NFS to share files between the VM host and VM guests, certain issues, described in this section, must be considered. While these considerations are only briefly discussed here, the considerations are discussed in more detail in Introduction to Network File System (NFS).
NTP Synchronization of CLients and Servers
Before installing NFS servers and clients, as a good practice suggested by Arch Linux, a time synchronization service such as Network Time Protocol daemon or Chrony be enabled on all NFS server and client computers.
FQDN of NFS Server and Clients
When mounting the exported filesystems in the NFS client with the mount command, the NFS server is identified. The server may be identified with an IP address, but in some cases -- as described in the Arch Linux Wiki page on NFS -- it must be identified with a fully qualified host domain name (FQDN), otherwise the mount command will hang. For our use case, where all NFS servers and clients are on a local network(a VirtualBox host-only network), we can simply use the /etc/hosts file to provide our NFS servers an FQDN. The following listing shows the /etc/hosts for the Arch Linux instance used in this article as an NFS server.
100% 17:01:18 USER: brook HOST: ARCH-16ITH6
~ ❯$ head -n 25 /etc/hosts
# Generated with hBlock 3.4.0 (https://github.com/hectorm/hblock)
# Blocked domains: 244157
# Date: Sat Jul 9 20:42:27 EDT 2022
# BEGIN HEADER
127.0.0.1 localhost.localdomain localhost
127.0.1.1 ARCH-16ITH6.localdomain ARCH-16ITH6
255.255.255.255 broadcasthost
::1 localhost ARCH-16ITH6
::1 ip6-localhost ip6-loopback
fe00::0 ip6-localnet
ff00::0 ip6-mcastprefix
ff02::1 ip6-allnodes
ff02::2 ip6-allrouters
ff02::3 ip6-allhosts
# END HEADER
# BEGIN BLOCKLIST
0.0.0.0 0--e.info
0.0.0.0 0-0.fr
0.0.0.0 0-gkm-portal.net.daraz.com
0.0.0.0 0-owazo4.net.zooplus.de
0.0.0.0 0.0.0.0.beeglivesex.com
0.0.0.0 0.0.0.0.creative.hpyrdr.com
0.0.0.0 0.0.0.0.hpyrdr.com
100% 17:02:14 USER: brook HOST: ARCH-16ITH6
~ ❯$
This file was originally generated by hblock, but then edited after generation to include the line
127.0.1.1 ARCH-16ITH6.localdomain ARCH-16ITH6
making the FQDN of the host ARCH-16ITH6.localdomain.
It is also necessary to add the VirtualBox host-only network IP address of the VM host to the /etc/hosts file of each VM guest that will be an NFS client. For the Arch Linux host mentioned above, we will enter 192.168.56.1 ARCH-16ITH6.localdomain. The following listing shows the contents of /etc/hosts on the Rocky Linux VM guest at the host-only network IP 192.168.56.103. Specifying a FQDN in the hostname specification area of the VM hosts /etc/hosts and adding a corresponding entry in the VM guests /etc/hosts allows access to the VM host by FQDN instead of by the IP; in the mount command to import the shared directories, we can use ARCH-16ITH6.localdomain instead of 192.168.56.1, as shown in later in this article.
[brook@Rocky16ITH6-VM1 ~]$ cat /etc/hosts
127.0.0.1   localhost localhost.localdomain localhost4 localhost4.localdomain4
::1         localhost localhost.localdomain localhost6 localhost6.localdomain6

192.168.56.1    ARCH-16ITH6.localdomain
Ensure Ports are Accessible
If using a firewall to protect the NFS server, before configuring NFS, the ports necessary for its operation must be accessible to incoming connections. The necessary ports and the services associated with them are shown in the following table.
| Service |
NFSv3 |
NFSv4 |
| nfs |
2049 TCP/UDP |
2049 TCP |
| rpcbind |
111 TCP/UDP |
N/A |
| mountd |
20048 TCP/UDP |
N/A |
For NFSv4, only TCP port 2049 is required to be be open. If the NFS server or clients do not support this version, if the NFS server is configured to not use NFSv4 -- which is not the case in the examples used in this article, or if NFSv3 is also to be supported, other ports, namely ports 111, used by rpcbind, and 20048, used by rpc.mountd must also be open.
UID and GID Matching Between NFS Server User and NFS Client User
The basic security of NFS relies on matching the UID/GID of the owner of the files shared by the NFS server to the UID/GID of the user on the NFS client attempting to access files in exported directories. In the NFS use case of this article, where clients and servers are on the same trusted local network, this security mode is sufficient, but UID/GID must match between NFS clients and servers in order for the files to be accessed from the client.
Configuring NFS on Host (NFS Server)
The essence of configuring an NFS server -- after ensuring the firewall, if enabled, is set to allow connections on the relevant ports mentioned above -- is specifying the directories to be shared -- or exported in the NFS configuration file /etc/exports and specifying the remote hosts or networks that will be allowed to import the shared directories. A systemd service nfs-server.service, if enabled will execute the exportfs program which will actually start the sharing through NFS.
/etc/exports
The format of entries in /etc/exports consists of the following elements separated by whitespace
- the filesystem hierarchy path of the directory to be exported
- an identification of the remote hosts that are allowed to import the exported directory, identified either as individual hosts, as members of a (sub-)network, or as members of an NIS netgroup, with an optional set of NFS options inside parentheses that immediately follows the host(s) identification
If options are not specified for a host a default set of options are used. Some important NFS options, especially in the use case discussed in this article are:
- ro; will only allow read only access to the client; the rw option overrides this default option
- sync; the NFS server will only respond to requests after previous requests are completed; the async option overrides this default option
- wdelay; this option causes the NFS server to delay writing to disk of it anticipates imminent write requests, thereby improving performance; the no_wdelay option overrides this default
The same directory can be exported to multiple hosts can by listing each host or hosts along with their NFS options after the initial string that specifies the exported directory. Or the exported directory can be listed multiple times with a single host(s) identification.
nfs-server.service and exportfs
After specification of directories to be exported in /etc/exports, the actual exporting of the specified directories is initiated by the exportfs program. This command is typically started by the systemd service nfs-server.service, which also starts NFS related services which in turn start the various other NFS user-space components ((see Introduction to Network File System (NFS))). Enabling this service will ensure that the NFS network service will be available at boot. If the nfs-server.service is not enabled, it must be started manually whenever the NFS network service is needed.
Whenever the /etc/exports file is modified while the NFS network service is active, either the nfs-server.service must be restarted or exportfs -r executed, the -r option "reexporting" directories.
Arch
Based on the introduction to NFS configuration, above, all that is typically necessary is to edit /etc/exports and add a line such as
/home/brook/DataEXT4/SoftwareDownloads/RockyLinux 192.168.56.104 192.168.56.103 192.168.56.101
to allow the remote hosts at 192.168.56.104, 192.168.56.103, and 192.168.56.102 to import, or access, the exported directory with default NFS options. The NFS sharing of the specified directories is then started by starting the systemd service, if not enabled with:
systemctl start nfs-server.service
and enabling it if automatic starting of the NFS server at boot is desired. If the systemd service had already been enabled, the nfs-server.service is either restarted or exportfs -a executed.
It should be noted that although NFS options were not specified in the very simple /etc/exports specification, above, exportfs applies defaults to the exports as shown by the output of the exportfs -v command in the following listing. For all exports to all three remote hosts, the options sync, wdelay, hide, no_subtree_check, sec=sys, ro, secure, root_squash, no_all_squash are applied automatically. The most important of these options were described above in the section Configuring NFS on Host (NFS Server), but a fuller list of the options is described in Introduction to Network File System (NFS).
58% 17:21:10 USER: brook HOST: ARCH-16ITH6
~ ❯$ sudo exportfs -v
/home/brook/DataEXT4/SoftwareDownloads/RockyLinux
192.168.56.104(sync,wdelay,hide,no_subtree_check,sec=sys,ro,secure,root_squash,no_all_squash)
/home/brook/DataEXT4/SoftwareDownloads/RockyLinux
192.168.56.103(sync,wdelay,hide,no_subtree_check,sec=sys,ro,secure,root_squash,no_all_squash)
/home/brook/DataEXT4/SoftwareDownloads/RockyLinux
192.168.56.101(sync,wdelay,hide,no_subtree_check,sec=sys,ro,secure,root_squash,no_all_squash)
openSUSE
Configuration of an NFS server is easily done with the YaST NFS module as shown in the following set of images.
-
Image 1 shows the main YaST interface with the NFS Server launcher highlighted.
-
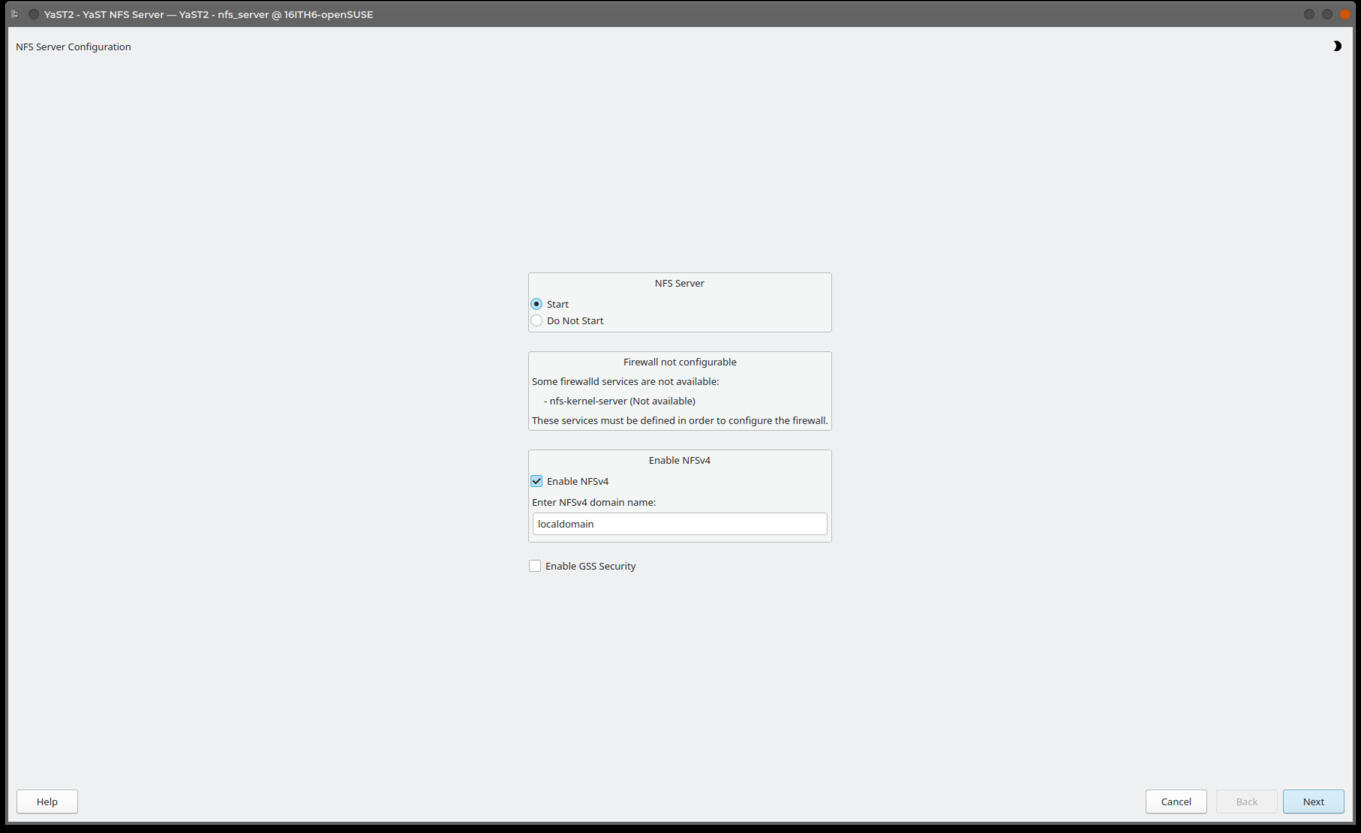
Clicking the launcher activates the main screen of the YaST NFS module, shown in the featured image and in Image 2. On this screen, the main NFS service can be set to be enabled such that it started automatically by ensuring the "Start" radio button is activated under NFS Server; NFSv4 can be explicitly enabled by ensuring the "Enable NFSv4" checkbox is activated, otherwise only NFSv3 will be available; and NFS can be set to use Kerberos authentication, if it is already configured on the system, by activating the "Enable GSS Security" checkbox. According to openSUSE documentation, the message "Firewall not configurable" -- that appears where, presumably, firewall parameters relevant to NFS would be set -- is a cosmetic defect due to the fact that openSUSE only recently switched to firewalld from SuSE Firewall2 and the new firewall is not yet fully implemented in YaST. It can be configured separately in the YaST Firewall component, as shown previously in this article, to ensure that the necessary port(s) are open.
-
Clicking the "Next" button at the bottom of the main YaSt NFS Server screen opens the screen shown in Image 3. Here, directories that are already configured to be exported are shown in the top pane, and hosts that are configured to access the selected exported directory in the top pane, are shown in the bottom pane. The controls on this screen are very intuitive; clicking the "Add Directory" opens a dialog box in which a directory to be exported is added, and the "Add Host" button opens a dialog in which client hosts that can access import the directory cab be specidied. Modifications entered using these two buttons makes the appropriate additions to the /etc/exports file. The image shows that a directory has already been added and two hosts already specified as able to access the directory.
-
Image 4 shows the dialog that is opened when clicking the "Add Directory" button. A file path can be entered in the text box, or with the "Browse" button a file manager window can be opened to select the directory to export.
-
Image 5 illustrates the the dialog that is opened when clicking the "Add Host" button. Any of the possible methods to identify a host or a group of hosts in the /etc/exports file can be entered in the "Host Wild Card" box. The NFS options for the host -- options that would appear in the parentheses immediately following the host identification in the exports file -- can be entered in the "Options" text box. Leaving this box blank will cause default options to be automatically applied in the /etc/exports file.
-
Image 6 shows the addition of another NFS client host as being able to access the selected exported directory.
-
And Image 7 shows the change to the previous screen after the new client has been added.
Configuring NFS Server in openSUSE's YaST
Configuration of an NFS Server in openSUSE is Simple and Automated in YaST
Click on any of the thumbnails to view a slideshow of the images.
The /etc/exports file generated by the above YaST NFS Server configuration actions is shown in the listing below.
100% 18:44:22 USER: brook HOST: 16ITH6-openSUSE
~ ❯$ cat /etc/exports
/home/brook/DataEXT4/SoftwareDownloads 192.168.56.104(ro,root_squash,sync,no_subtree_check) 192.168.56.103(ro,root_squash,sync,no_subtree_check) 192.168.56.101(ro,root_squash,sync,no_subtree_check) 192.168.56.102(ro,root_squash,sync,no_subtree_check)
Configuring NFS Client
Configuration of an NFS client host only requires installation of the package that contains the appropriate client components. After necessary components are installed, only a mount command is necessary to access the directories exported by the client. To make the mount of imported directories persistent, a line can be added to /etc/fstab.
Installation of NFS Client Components
On some distributions the package that contains NFS client components is the same as the package that contains the NFS server components themselves, typically in the package nfs-utils. This is the case with Arch Linux and Red Hat Enterprise Linux (and clones); with these distributions, installing nfs-utils installs both NFS server and client components.
In other distributions, the NFS client components are in a separate package from the NFS server components. In openSUSE, the package nfs-client contains the necessary client components, while the optional package yast2-nfs-client enables a YaST module which allows configuration of a persistent mount of imported directories by adding a line in /etc/fstab through a GUI.
Ubuntu also packages the NFS client separately from the NFS server components. The only necessary package for enabling an NFS client in this distribution is nfs-common
Mounting Imported Directories
After ensuring the necessary client components are installed, all that is necessary is to mount imported directories. The exports available from an NFS server by the client can be verified in the client with the showmount -e command, identifying the NFS server as an argument, as shown in the following listing.
[brook@Rocky16ITH6-VM1 ~]$ showmount -e 192.168.56.1
Export list for 192.168.56.1:
/home/brook/DataEXT4/SoftwareDownloads/RockyLinux 192.168.56.101,192.168.56.103,192.168.56.104
The available exports can be imported with a mount command of the form
mount server-identification:/path/of/exported/directory /path/of/local/mount/point
For example, our simple /etc/exports configuration on the VM host acting as the NFS server could be imported in the VM guest with the a command such as
sudo mount 192.168.56.1:/home/brook/DataEXT4/SoftwareDownloads /mnt/hostnfs
or, as discussed in Configuring NFS on Host (NFS Server) -> Arch, the NFS server can be identified with a fully qualified domain name as illustrated in the following listing, necessary if the mount command hangs -- as long as a FQDN has been set up for the NFS server, as discussed in Prerequisites to Configuration of NFS Server on VM Host -> FQDN of NFS Server and Clients, above.
sudo mount ARCH-16ITH6.localdomain:/home/brook/DataEXT4/SoftwareDownloads /mnt/hostnfs
To make the mount persistent after reboots, the details of the imported directory in the mount command can instead be placed in /etc/fstab with a line similar to that of a line that specifies local storage, i.e.,
server-identification:/path/of/exported/directory /path/of/local/mount/point fstype option1,option2,...,optionN 0 0
server:path identifies the NFS server and the exported directory, where "server" can be an IP address or a fully qualified domain name, and path is the exported directory as specified in the NFS server's /etc/exports file. For example, the following line in /etc/fstab is equivalent to the mount command above.
192.168.56.1:/home/brook/DataEXT4/SoftwareDownloads/RockyLinux /mnt/hostnfs nfs defaults 0 0
Accessing VM Host Shared Directories from VM Guest
Arch VM Host NFS Server
Using this exports configuration on the server, a client can mount the exported directory with:
sudo mount ARCH-16ITH6.localdomain:/home/brook/DataEXT4/SoftwareDownloads/RockyLinux /mnt/hostnfs/
This basic exports configuration on the Arch Linux VirtualBox host was adequate to allow the Rocky Linux VM -- labeled as VM3 - Rocky Linux 8.6 (RHEL 8) in the diagram at the top of the article -- to import the exported directory. The following listing shows the mount command executed in the NFS client to mount the export in the local filesystem hierarchy. The lisitng also shows the client accessing the export with the ls command. The third command shown in the listing provides statistics on the NFS mount indicating details such as an identification of the NFS server (as the FQDN) and as an IP address, the clients IP address, the mount location, the NFS options, and the version of the NFS protocol in use -- in this case version 4.2.
[brook@Rocky16ITH6-VM1 ~]$ sudo mount ARCH-16ITH6.localdomain:/home/brook/DataEXT4/SoftwareDownloads/RockyLinux /mnt/hostnfs/
[brook@Rocky16ITH6-VM1 ~]$ ls -l /mnt/hostnfs
total 10950668
-rw-r--r--. 1 brook brook         450 Jul 10 00:28 CHECKSUM
-rw-r--r--. 1 brook brook 11213471744 Jul 10 00:12 Rocky-8.6-x86_64-dvd1.iso
-rw-r--r--. 1 brook brook        2776 Jul 12 18:27 rockyvm2-ks.cfg
[brook@Rocky16ITH6-VM1 ~]$ nfsstat -m
/mnt/hostnfs from ARCH-16ITH6.localdomain:/home/brook/DataEXT4/SoftwareDownloads/RockyLinux
 Flags: rw,relatime,vers=4.2,rsize=1048576,wsize=1048576,namlen=255,hard,proto=tcp,timeo=600,retrans=2,sec=sys,clientaddr=192.168.56.103,local_lock=none,addr=192.168.56.1

[brook@Rocky16ITH6-VM1 ~]$
openSUSE VM Host NFS Server
With this configuration on the openSUSE physical host acting as an NFS server, we are ready to use the import the exports in the Rocky Linux VM. On the client we can verify the exported directories on the server, mount the exports on a mountpoint in the client's filesystem hierarchy, and verify that the NFS mount with nfsstat -m, and access the imported filesystem, as shown in the following listing/
[brook@Rocky16ITH6-VM1 ~]$ showmount -e 192.168.56.1
Export list for 192.168.56.1:
/home/brook/DataEXT4/SoftwareDownloads 192.168.56.102,192.168.56.101,192.168.56.103,192.168.56.104
[brook@Rocky16ITH6-VM1 ~]$ sudo mount 192.168.56.1:/home/brook/DataEXT4/SoftwareDownloads /mnt/hostnfs
[brook@Rocky16ITH6-VM1 ~]$ nfsstat -m
/mnt/hostnfs from 192.168.56.1:/home/brook/DataEXT4/SoftwareDownloads
 Flags: rw,relatime,vers=4.2,rsize=1048576,wsize=1048576,namlen=255,hard,proto=tcp,timeo=600,retrans=2,sec=sys,clientaddr=192.168.56.103,local_lock=none,addr=192.168.56.1

[brook@Rocky16ITH6-VM1 ~]$ ls -l /mnt/hostnfs
total 24
drwxr-x--x. 3 brook brook 4096 Feb 12 01:17 Arch
drwxr-x--x. 2 brook brook 4096 Jun  1 16:02 Mozilla
drwxr-x--x. 2 brook brook 4096 Jul 23 18:53 RockyLinux
drwxr-x--x. 2 brook brook 4096 Dec 11  2020 texlive
drwxr-x--x. 2 brook users 4096 Jul 17 15:30 VirtualBox
drwxr-x--x. 2 brook users 4096 Jul  1 00:34 vivaldi
[brook@Rocky16ITH6-VM1 ~]$